JVA Quick Start Guide: Wi-Fi Gateway
.jpg)
Introduction
The PTE0253 JVA Wi-Fi Gateway connects a group of JVA Z Series devices to the Cloud Router™ system via an existing 2.4GHz Wi-Fi network.
This quick-start guide tells you how to program the devices, and connect and configure the PTE0253 Wi-Fi Gateway.
Hardware Description
Hardware Installation
Wi-Fi Gateway Set-up
Troubleshoot
Reset the Wi-Fi Gateway
Configuring Cloud Router
Replacing an existing Wi-Fi Gateway
Specifications
| Electrical Supply | 12 V DC Power comes from the Keypad Bus connection |
|---|---|
| Communications | Keypad Bus Up to 15 Z Series devices can be connected Unit uses Keypad ID 6 |
| Wi-Fi | 2.4GHz 802.11 b/g/n |
| Wi-Fi Security | Open, WEP, WPA/WPA2 PSK |
Hardware Description Top^
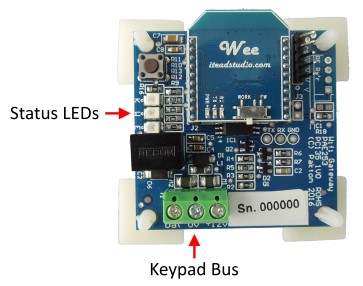
LED Indicators
| K | Blinks when the unit is communicating with Z series devices |
|---|---|
| W | Indicates the state of the Wi-Fi connection |
| E | Flashes an error code if there is a problem with the unit or group |
Before You Start Top^
Important: Make sure one Z Series device is programmed with ID 1.
Ensure the Z Series devices are configured appropriately. Power up all
devices and make sure they are disarmed. Refer to device manuals found at
http://www.jva-fence.com/downloads.php
If any keypads are connected to the group, make sure they are not on keypad ID 6.
Make sure the Wi-Fi Gateway is in range of your Wi-Fi network, the Wi-Fi network has a working
internet connection, and you know the network name (SSID) and password.
Installation Top^
Connect the Keypad Bus wires from the energizer to the Wi-Fi Gateway.
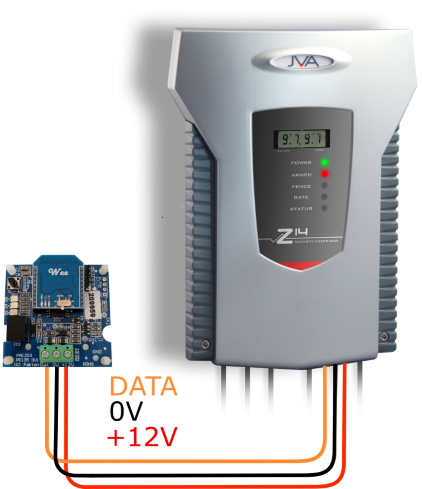
Confirm the ‘K’ light is flashing, and the ‘E’ light is not flashing.
It is recommended to complete Wi-Fi network set-up before final installation, in case access to the
push button is required.
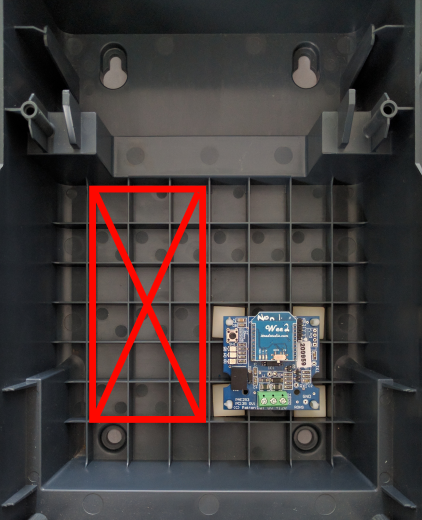
The Wi-Fi Gateway is fitted with adhesive feet and can be
fitted to an enclosure wall, or inside a Z series energizer
case. If it is installed inside a Z series case, make sure it is
not placed within the red ‘X’ as it will be too close to high
voltage elements and could result in damage to the Wi-Fi
Gateway or energizer.
Wi-Fi Set-Up Top^
Android Users: Install and run the App from the Google play store
 Android Users, PC Users, iOS Users: Use the Virtual Keypad by following the process below:
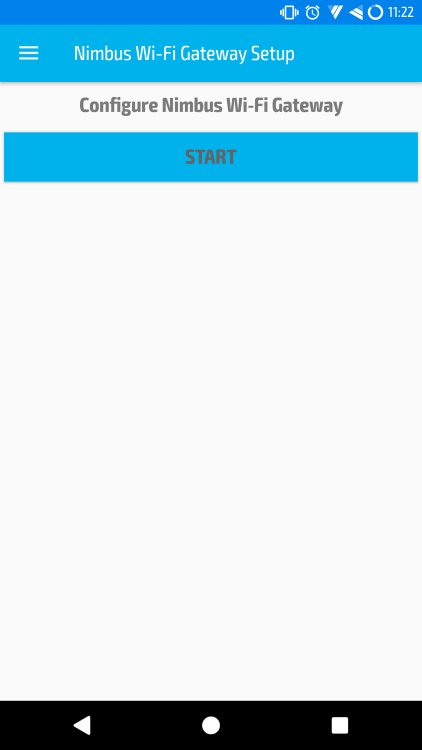
 Wi-Fi Gateway Configuration.
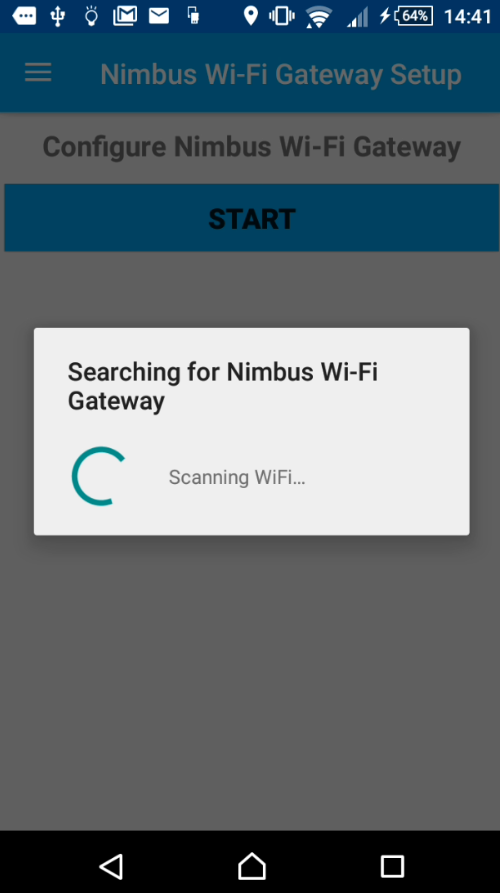
Press ‘Start’. The app will begin searching for your Wi-Fi Gateway.
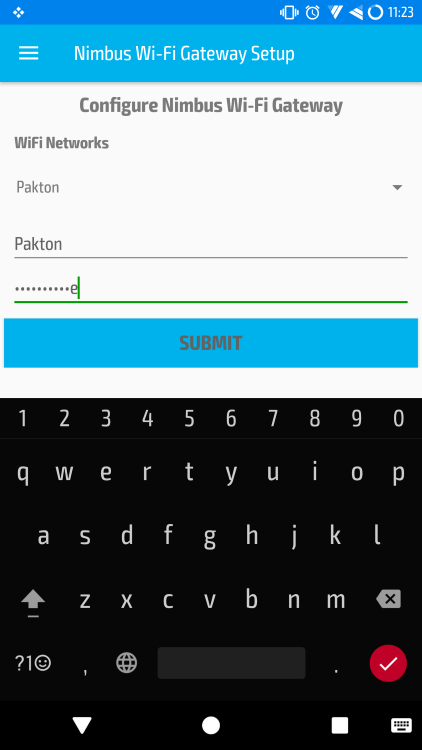
Choose your Wi-Fi network name (SSID) from the drop-down list.
Enter your Wi-Fi network password. Press ‘Submit’.
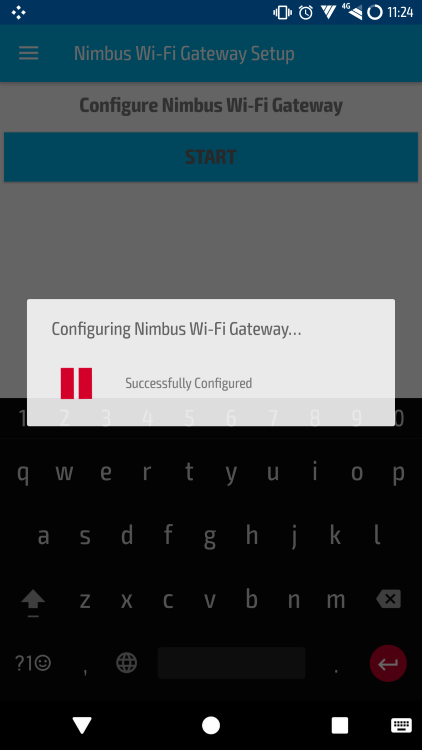
The ‘W’ LED on the Wi-Fi Gateway will begin blinking twice to indicate it is trying to connect to
your Wi-Fi network. It should go to a slow blink within 30 seconds. If it does not, the most
common cause is an incorrect password. Remove power from the connected energizer, hold
down the Gateway push button, re-apply power to the energizer, wait until the Gateway LEDs
blink rapidly, then release the push button. You can now repeat the Wi-Fi setup procedure.
If the Gateway ‘W’ LED is blinking slowly, you are ready to add your devices to the Cloud Router™
system.
Configuring the Cloud Router™ Top^
Go to www.jva-fence.com/security/cloudrouter for the Cloud Router™ setup guide.
Troubleshoot Top^
| Failure | Probable cause | Solution |
|---|---|---|
| No lights on | Connected energizer is off Power is not connected Power wires are reversed |
Connect power to energizer Check keypad bus +12V and GND connections Check voltage at keypad bus +12V and GND connections with a multimeter |
| LED 'K' does not flash | Keyboard bus is not connected | Check the keypad bus DATA and GND connections |
| LED 'W' flashes once | Wi-Fi not configured | Configure the Gateway using the Nimbus Wi-Fi Gateway Setup app. See section ‘Wi-Fi Set-up’ |
| LED 'W' flashes twice App can’t find gateway |
Incorrect Wi-Fi password Gateway already (incorrectly) configured |
Reset Gateway (see below) and reconfigure as per section ‘Wi-Fi Set-up’ |
| App does not show Wi-Fi networks | Poor signal strength | Move the Wi-Fi router, change antennas or install a Wi-Fi range extender |
| Unit does not control the energizer(s) | Master energizer is not polling Gateway | Reset the group master (ID 1) by turning off and on again |
| Another keypad or keypad device is connected with keypad ID 6 | Disconnect the other keypad, or change its keypad ID to something other than 6 | |
| Group configured incorrectly | Ensure at least one energizer as master (device ID 1) and any others have unique device IDs of 2 or more |
If the unit is still not working correctly, contact your nearest JVA distributor for technical support.
Replacing an existing Wi-Fi Gateway
Reset the Wi-Fi Gateway Top^
If the Wi-Fi configuration is incorrect, the Gateway will need to be reset.
- Remove power from the Gateway, by removing power from the connected energizer
- Hold down the Gateway push button
- Apply power to the energizer while still holding the Gateway push button
- Wait for the Gateway lights to flash in a regular pattern
- Release the Gateway push button
If the Gateway has been successfully reset, the 'W' light will be flashing once.
Wi-Fi Gateway Set-up
JVA Distributors Top^
If you have questions or need further assistance, please email us at sales@jva-fence.com.au or call:
| Region | Number |
|---|---|
| Chile | 02 2211 80 00 |
| Australia | 07 3103 0582 |
| South Africa | 0861 782 349 |
| World Wide | +61 7 3103 0582 |
For more information on our range of electric fence products visit the JVA website at www.jva-fence.com